
Add Media to your Treehouse:
- 1. Adding Media
- 2. Upload Media
- 3. Insert Media
3. Insert Media into your Treehouse
treehouse builders toolkit
- To insert media into your treehouse you should first:
- Log-in as a treehouse builder
- Choose to edit a treehouse page and click to Edit Step 2. Main Content (or another step where you can add media)
- Determine whether you will use the Easy Editor or if you will turn it off. In some browsers, such as Safari, the Easy Editor will not work.
- Insert images with the Easy Editor
- Insert media (movies, sounds, documents) with the Easy Editor
- Insert media / images without the Easy Editor
Insert Images with the Easy Editor
Inserting images involves several steps.
- Click the Insert Image Button
 . After the you click the button the "Add an Image to a Treehouse Page" window will open. From here you can find an image to insert or upload a new image to the ToL database.
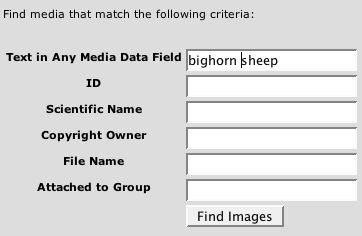
 - Search for an image to insert. Follow the tips in the search box or for extra help visit Follow the tips in the search box or for extra help visit Help Finding Media in the ToL Database. You will search the ToL database for all of the images that are not restricted by the original contributor.
- For example, if you would like to find an image of a bighorn sheep to illustrate a section of your page,
you could type "bighorn sheep" into the Text in Any Image Data Field.
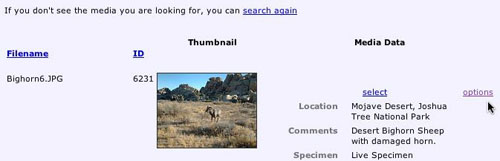
- Once you have found the image you want, click the link for "options" (on the far right) in order to select a size for the image you will insert into your page.
- Next, you will choose a size to use in your page by selecting the link for the size that you would prefer. Note that soon we will have buttons to increase and decrease image dimensions in the Easy Editor toolbar and this step will not be necessary.
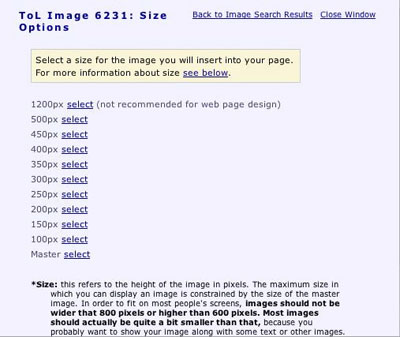
- After you have completed this last step, the image will be inserted into your page! The image is inserted along with its copyright information and scientific name if available.
- You can add additional information to the image caption by clicking into the caption area and typing text. Note that you must not change or erase any of the information that was automatically inserted into the caption.
- To format the image, click on it, then use the image formatting buttons in the second row of the Easy Editor. See the section directly below, Formatting Images, for help styling your images after they are inserted.
- Note that if you want to move and image to another part of the page it is best to delete it and reinsert it in the spot you want it. If you don't do the If you are familiar with HTML you can also choose to see the HTML and move you image in that manner.
Formatting Images
- The default is for images to be inserted with a center alignment, no border.
- To change the default you must click on the image you have inserted in order for the formatting choices to become activated in the toolbar.
- View formatting options directly below.


 Border/No Border buttons
 -


 Block: Align Left, Center and Right. Choose these buttons if you want the image to display as a block element, e.g. appear alone, with all other text or images displayed either before or after the image.
 Float Left and Right. Select these buttons if you want the text to wrap around the image. Floating can look very nice but there are techniques to optimizing the display of floated images. For example, it's best to widen and narrow your browser window after you have applied a float to an image to see how it displays at different browser sizes.
-


 Inline: Align Bottom, Middle and Right. Choose these buttons if you would like other text or images to be included on the line with the image you have inserted. Unlike floating, only the contents of one line of the page will display with the image.
Insert Media with the Easy Editor
You can now insert media (movies, sounds, documents) into your treehouse page using the Easy Editor. Simply select the Add Media button ![]() , and search for media in the same manner as you would for an image (see above).
, and search for media in the same manner as you would for an image (see above).
Worksheets for Organizing and Recording Information about Media for Your Treehouses
Image ID Worksheet. Use this worksheet to record the image ID numbers of images you may want to use in your treehouse. You can also record the type of image, place you would like to use the image, the place you found/and or copyright owner of the image, and the ToL image use permitted by copyright holder.
Recording Information for Uploading Images to the ToL Database Worksheet. Use this worksheet to record data for images that you will upload to the ToL Database to use in a treehouse. Categories that you must have filled out in order to upload the image to the ToL Database say (required).